FORCE HTTPS/SSL
Today all websites must be configured to run traffic through SSL/HTTPS. If not configured correctly web browsers may show a warning in the address bar, warn visitors that a site is not secure or worse block visitors from visiting the website. There are many different reasons for a website to be considered not secure. The purpose of this tutorial is to fix one of the most common issues where visitors can visit both secure (https) and insecure (HTTP) versions of a site. To resolve this we need to do what is referred to as “Force HTTPS” by editing a server file named .htaccess
Recently I was asked to take a look at a friend’s website because he was getting a message in his browser that his blog was not secure. I have a fair bit of experience resolving these types of issues so I agreed to take a look.
There are various tools available to analyze websites and browser security messages that pertain to SSL/HTTPS. The two I use most often are Why No Padlock and the developer tools built into Google’s Chrome browser. In this case Why No Padlock was all I needed.
TESTING A WEBSITE FOR HTTPS and SSL SECURITY PROBLEMS
I entered my friend’s website home page into the Why No Padlock URL window and the website ran a string of tests. The results of the test pointed to three problems, two of which I could address and the 3rd would easily be handled by the WebHost (Liquid Web) support team.
PROTOCOLS
You currently have TLSv1 enabled. This version of TLS is being phased out. This warning won’t break your padlock, however, if you run an eCommerce site, PCI requirements state that TLSv1 must be disabled by June 30, 2018.
This was resolved by Liquid Web through their help desk.
MIXED CONTENT
The mixed content was easy to fix. The mixed content was being generated from the content being linked from other websites. That mixed content was in the form of banner advertisements. These banner ads had images that were not running over SSL. There were two easy fixes. The first was for ads that had a full path like http://bannerad.com/ad.jpg. I simply added an “s” to the Http making the URL https://bannerad.com/ad.jpg.

Mixed Content Error Examples
The other fix was equally as easy just a little more time-consuming. I saved the banner ad images and loaded them into the WordPress media library. I then updated the ads to the locally hosted images rather than those of the provider. This also helps with page speed and SEO. In general, on all my websites that run banner advertisements if the source image is static (never changes), I always host the images myself.
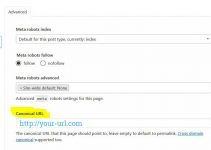
FORCE HTTPS
The “Force HTTPS” message stated “Your webserver is not forcing the use of SSL. You may want to add a redirect to ensure a secure connection is used“. This basically means that if someone types http://andrewschur.com or http://www.andrewschur.com they will go to that non SSL/HTTPS version of my website. This means the resulting connection would be insecure. This is bad. The goal is to have ALL WEBSITE TRAFFIC routed over SSL/HTTPS https://andrewschur.com and https://www.andrewschur.com.

FORCE HTTPS MESSAGE
Fortunately forcing https will be very easy once I show you how to do it in the steps below.
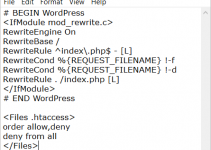
HOW to REDIRECT HTTP to HTTPS WITH a .HTACCESS FILE
Forcing or redirecting Http to https is simple and straight forward with the proper knowledge and tools. The goal is to modify a file in the root directory of your website. This file is named .htaccess. and we need to edit this file and add a few lines of code to it. Don’t worry you are just going to copy and paste the code I provided below or copy and paste from this text file.
FORCE HTTPS
Copy and paste the code below at the very end of your .htaccess file| RewriteEngine On RewriteCond %{HTTPS} off RewriteCond %{HTTP:X-Forwarded-Proto} !https RewriteRule ^(.*)$ https://%{HTTP_HOST}/$1 [R=301,L] |
HOW DO I EDIT A HTACCESS FILE?
There are multiple ways to edit a .htaccess file. I recommend anyone of the following methods.
- Edit the .htaccess file directly in an FTP client. I suggest Filezilla
- Download the .htaccess file to your computer with an FTP client and edit with notepad, then upload
- Edit the .htaccess file in Adobe Dreamweaver. This is my preferred method because it is the fastest and easiest method.
- Use the cPanel File Manager at your WebHost
Important: Always create a backup copy of your .htaccess file in case something goes wrong.
EDIT THE .htaccess FILE DIRECTLY IN A FTP CLIENT – Filezilla

Edit htaccess File In Filezilla Ftp

Edit the htaccess file in Notepad
- Open Filezilla and select File > Site Manager > Connect to connect to your website.
- In the right pane Remote Site click the directory (
public_htmlorwww) to expand the files in the pane below. - Right-click the .htaccess file and select View/Edit to edit the file in Notepad.
- Paste the redirect code above the existing content and save the file.
- When closing the file you will be prompted to upload the modified or changed file. You need to do this for the changes to work
DOWNLOAD THE .htaccess FILE WITH AN FTP CLIENT AND EDIT ON YOUR COMPUTER
- Open Filezilla and select File > Site Manager > Connect to connect to your website.
- In the right pane Remote Site click the directory (
public_htmlorwww) to expand the files in the pane below. - Right-click the .htaccess file and select Download to save and edit the file on your computer.
- Browse to the location where the .htaccess file was saved.
- Double click the file to open it. When prompted for a program to open the file with choose Notepad.
- Paste the redirect code above the existing content and save the file.
- In Filezilla, bottom left Local Files pane, right-click the edited file and upload the modified file. If prompted to overwrite the existing file choose yes.
EDIT THE .htaccess FILE IN ADOBE DREAMWEAVER

Example of Forced HTTPS In WordPress htaccess File
- Open Adobe Dreamweaver.
- In the Files pane select the website that needs the .htaccess file modified.
- Switch to the Remote Server.
- Right-click the .htaccess file and select GET to download the file to your computer.
- Switch from Remote Server to Local View.
- Right-click the .htaccess file and select Edit > Duplicate to create a backup copy of the file.
- Right-click the .htaccess file and select Edit or Double Click to edit the file.
- Paste the redirect code above the existing content.
- File > Save to save the file.
- Right-click Put or Site > Put to upload the modified .htaccess file. If prompted to include related files select no.
EDIT THE .htaccess FILE WITH THE cPanel FILE MANAGER AT YOUR WEBHOST
- Log in to cPanel.
- In the Files section, click on the File Manager icon.
- Select the WebRoot directory (
public_htmlorwww) for the most direct route to your files. - Be sure the Show hidden files(dotfiles) box is checked.
- Click the GO button to continue.
- Click and highlight the .htaccess file.
- Choose the code editor from the top toolbar: Code Edit allows the user to edit a document as code and will give line numbers down the side of the editor.
- Click Edit from the pop-up window to open the editor in a new window.
- Paste the force https redirect code at the top of your .htaccess file. Important make sure the code is outside of other code like WordPress.
- Click Save Changes once you are done editing your document.
ADDITIONAL RESOURCES
Different server environments and different redirect needs mean there are additional types of redirects. My article above is based on a Liquid Web-hosted server. If the article above doesn’t exactly fit your needs visit the links below.
- Liquid Web Redirect to HTTPS
-
Server Guy Redirecting HTTP to HTTPS Using .htaccess File: Step by Step
-
Dreamhost Force your site to load securely with an .htaccess file
Cpanel Information:
And what is better to choose, redirect through the code in htaccess or how to force in the server settings. Which method will be better?